
Complete Step-by-Step Guide to Brick Chimney Renovation
- Milan Mrmos
- Mar 25
- 7 min read

A worn chimney can turn into a real headache. Water leaks. Crumbling mortar. Loose bricks. I saw all of that on my own house. The chimney looked solid on the outside, but every rainstorm brought more trouble inside.
I put off the repair longer than I should have. By the time I got serious, it took more than patchwork to fix it right.
You might be in the same spot. Or maybe you want to stay ahead of future problems before they grow. Either way, doing a proper chimney renovation can save thousands in long-term damage.
A good repair does not only fix leaks. It restores safety, stops decay, and brings back the strength and charm of that brickwork.
You do not need to guess your way through it. Every part of the job follows a clear process. You will see where to begin, how to check each part, and what to do when you reach the rebuilding stage.
You will also know when thin bricks can save time and cost without cutting corners.
Start with a solid inspection. Every fix starts there.
Inspect Every Part of the Brick Chimney Before Touching Anything
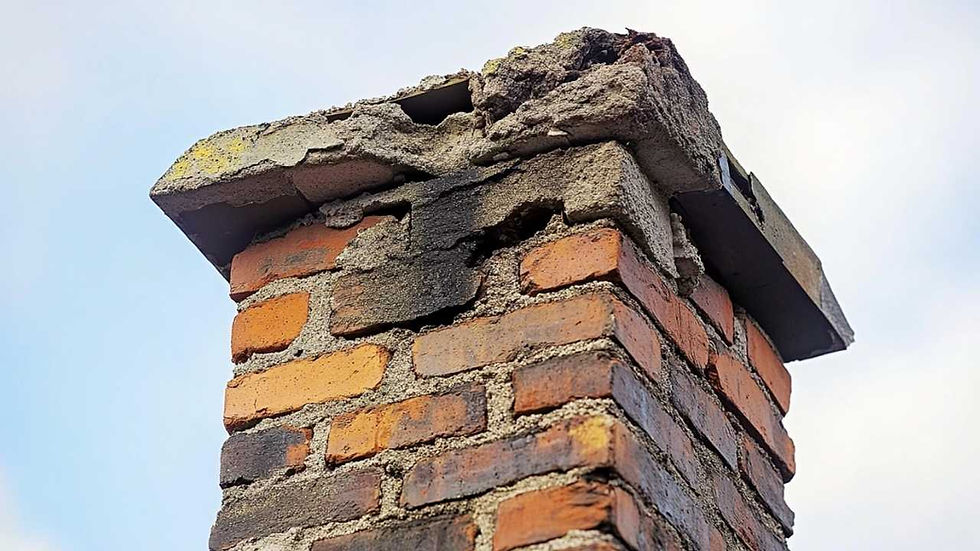
No chimney renovation starts with a hammer. It starts with a clear inspection. The surface might show cracks, but deeper damage can hide inside the crown, flue, or flashing. You must look at every layer.
Look for Visible Damage

Cracked bricks or flaking surfaces
Mortar gaps or loose joints
White stains (efflorescence), which show trapped moisture
Dark streaks or algae growth, which point to water leaks
Check the Chimney Crown
Look for hairline cracks or crumbled edges
Watch for pooling water, which weakens concrete fast
Inspect the Flashing
Check for rust, lift, or cracks along the metal base
Look for water stains in the attic near the chimney base
Examine the Flue and Interior

Shine a flashlight up the flue if possible
Check for blockages, missing liner sections, or crumbled clay tiles
Use a Professional Inspection If Needed
Hire a chimney sweep or mason if the structure looks unstable
Ask for a camera scan of the flue if your chimney connects to a fireplace
Start With a Proper Plan
After the inspection, step back and decide how deep the repair needs to go. Some chimneys need minor surface work.

Others call for a full structural rebuild. The right plan depends on what you saw during the inspection. You must also match tools and materials to the task.
Repair Type | Signs | Brick Type | Needed Materials | DIY or Pro |
Surface Repair | Light cracks, faded mortar, stains | Thin bricks | Veneer mortar, sealant, scraper, stiff brush | DIY possible |
Mortar Repointing | Gaps between bricks, loose joints | Full or original | Type N or S mortar, joint tool, tuckpointing bag | DIY with experience |
Crown Repair | Cracked or uneven top layer | Not needed | Crown mix, bonding agent, trowel, waterproof coating | DIY or Pro if deep cracks |
Flashing Repair | Rust, water entry near roof joint | Not needed | Sheet metal, sealant, roofing nails, flashing tape | DIY if accessible |
Structural Rebuild | Leaning, collapsing bricks, deep damage | Full bricks | Bricks, mortar, scaffolding, permits | Pro required |
Remove All Damaged Materials Without Hurting the Structure
Start with a slow, careful approach. Do not swing hard or use force. Every piece you remove must come out without shifting or cracking the rest of the chimney.
Focus on sections where bricks crumble, mortar breaks apart with touch, or edges flake into dust. If the chimney has deep cracks or leans, stop immediately and call a structural mason. Safety must guide every move.
Use hand tools like a hammer and cold chisel. Knock out loose bricks one at a time. Never try to pry from the middle.
Always start at the top or edge of the damaged area. Keep all good bricks if they match the original. Clean the sides with a wire brush and stack them for later reuse.
Mortar removal needs patience. Grind or chip out damaged joints to at least three-quarters of an inch in depth. Sweep or vacuum every joint before applying anything new. No dust. No loose grit.
A clean bond is the only way mortar holds. Every piece you leave weak will cost you double later.
Rebuild with Precision Using Proper Techniques and Tools
Every chimney rebuild must follow a clear process. You cannot guess or skip steps. Good brickwork requires alignment, correct materials, and close attention to detail. Start with a clean surface, a clear plan, and the right mix of mortar for the job.
Lay Bricks with Level Rows
Work from the base upward. Never start in the middle. Lay one row at a time. Check your alignment with a level after every course. Bricks must stay square, and joints must remain even. No rushing.
Apply only enough mortar for a few bricks at a time. Press each brick firmly into the bed and tap it in place with the handle of your trowel. Scrape away excess mortar before it hardens. Keep all joints full. Hollow joints fail fast.
Match Mortar to the Load
Use Type N mortar for general chimney work. It holds well and allows for slight movement.
Use Type S only if your chimney faces high winds or sits exposed with no shelter.
That mix gives more strength but less flexibility. Mix only small batches. Never reuse mortar after it starts to dry.
Use Guides to Stay True
Hold a plumb line or stretch a guide string on corners. Do not rely on your eye. Even slight shifts become visible over time. Stop often. Re-check your level. Clean your trowel every few minutes to keep mortar neat and workable.
Apply Thin Bricks for Cosmetic Restorations

Use thin bricks if the chimney core remains solid and only the outer face needs renewal. Prepare the surface with a scratch coat if the base is concrete or uneven. Let that base set.
Then apply a fresh coat of veneer mortar. Press thin bricks into place row by row. Leave consistent gaps between each unit for mortar joints. Cut bricks cleanly for edges. Never smear or overfill.
Thin brick works best for:
A solid but ugly chimney face
Restoring the original look without full weight
Areas with weight limits, such as rooftop zones
Recommendation - Rustic Collection Ravenna
Finish with Sealant
After full cure time, apply a breathable waterproof sealant. That layer protects against moisture, mold, and freeze cycles. Never seal early. Let all mortar fully set before any final treatment.
Repair or Replace the Chimney Crown for Maximum Water Protection
The crown guards the top of your chimney. One crack in that surface allows water to soak down into the brickwork.
Many chimney failures begin with crown damage. You must fix or replace it with the same care as the rest of the structure.
Check for Crown Damage
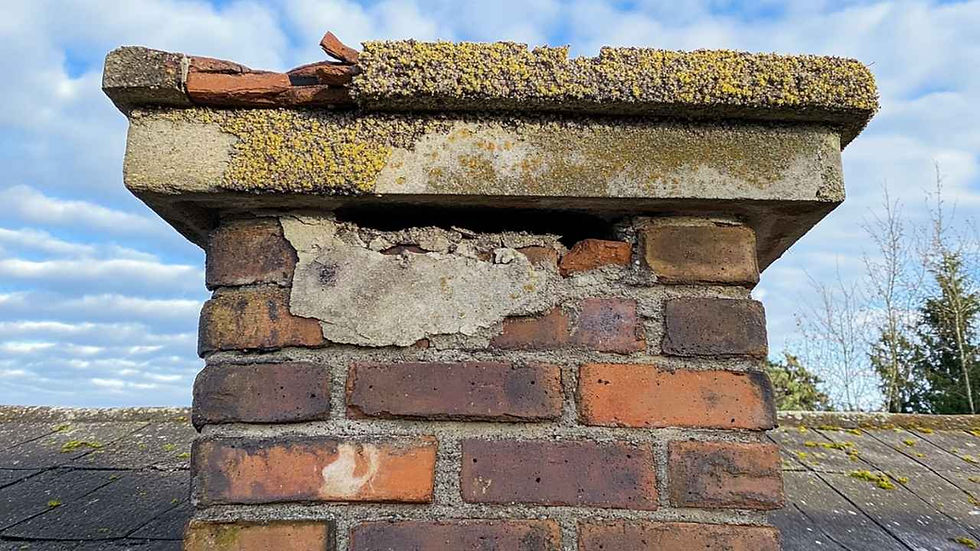
Use a ladder to inspect the crown closely. Look for signs of wear such as cracks, crumbling edges, or pooled water.
Any uneven surface can cause water to sit and freeze. That leads to long-term damage across the entire chimney.
Patch Small Cracks or Holes
If the crown stays mostly intact, apply a concrete patching compound made for chimney tops. Clean the area first. Remove all loose particles. Fill in gaps. Smooth the surface with a trowel. Let it dry fully before adding sealant.
Pour a New Crown if Needed

For full replacements, use a form to shape a new concrete crown. Allow at least two inches of overhang past the brick edge.
Slope the top so water runs off. Insert a bond break between the flue and the crown. That prevents cracks from movement. Allow full curing time before sealing.
Apply a Crown Sealant
After the new crown sets, coat it with a waterproof sealant made for masonry tops. That barrier protects the crown from sun, snow, and water damage. Never skip this step. The crown takes direct exposure year-round.
Install Flashing and a Cap to Keep Water and Debris Out for Good
Water always finds a way in unless you block every entry point. The flashing and the chimney cap both serve that goal. Done right, they keep out leaks, pests, and debris. You must handle both with care and precision.
Secure Flashing Where Chimney Meets Roof

Inspect the metal around the base of the chimney. Rust, gaps, or lifted edges all point to failure. Cut and fit new flashing if needed. Use roofing nails to secure each piece.
Seal the edges with high-grade masonry or roofing sealant. Press it smooth with a putty knife. Overlap layers to direct water away from seams.
Replace or Install a Chimney Cap

The cap covers the flue opening. It keeps out rain, birds, and leaves. Choose stainless steel or copper for long-term durability. Fit the cap over the flue and secure it with screws.
Some caps come with mesh sides. That helps block animals and sparks. Make sure it fits tight. A loose cap fails in high winds.
Test for Gaps or Loose Areas
After both flashing and cap go in, spray water lightly with a hose to check for leaks. Watch for drips inside the attic or near the chimney base. Fix any soft spots or unsealed edges.
Do a Final Check and Keep Up with Seasonal Maintenance
Once the work is complete, finish strong. A chimney is not a one-time fix. Small issues build over time. With regular care, your repair lasts for decades. Without it, trouble starts again fast.
Inspect Your Work
Go over every repair area. Tap bricks lightly to check for loose ones. Run your hand along mortar lines to check for gaps.
Look at the crown for signs of early cracking. Check the flashing for fresh lift or sealant failure.
Clean and Clear the Flue
Use a chimney brush to clear out any loose dust or debris. If the flue looks blocked or uneven, call a sweep for a full cleaning. Good airflow keeps smoke, gas, and moisture moving out.
Set a Seasonal Maintenance Schedule
Plan to check your chimney in early fall and spring. Cold, wet months do the most damage. Look for fresh stains, cracks, or animal signs. Spotting issues early saves major cost later.
The Bottom Line
A brick chimney will never fix itself. Cracks spread. Water creeps in. One weak point turns into ten.
You either face it early or pay for it later. Every step in this guide gives you control before things go too far.
You do not need shortcuts. You need solid work. Inspect everything. Remove the damage. Rebuild only what needs it. Use thin bricks only when the structure allows. Seal every layer. Finish strong.


Comments